I love conferences because I always learn something new and Graphical Web 2016 was no exception. Amongst all the new things I learnt was a new word and new concept - sparklines. One of my favourite descriptions of a sparkline is by Edward Tufte who described them as “data-intense, design-simple, word-sized graphics” *. For example a sparkline might add more context to explain how Graphical Web effected my knowledge of sparklines: ᴶᴬᴺ²⁰¹⁶▁▁▁▁▁▁▁▁▁▁██ᴶᴬᴺ²⁰¹⁷. If you wan’t to learn something new too then all the Graphical Web talks are up on YouTube including Matt Ström talking about Tiny Data Visualisations which is what inspired this side project.
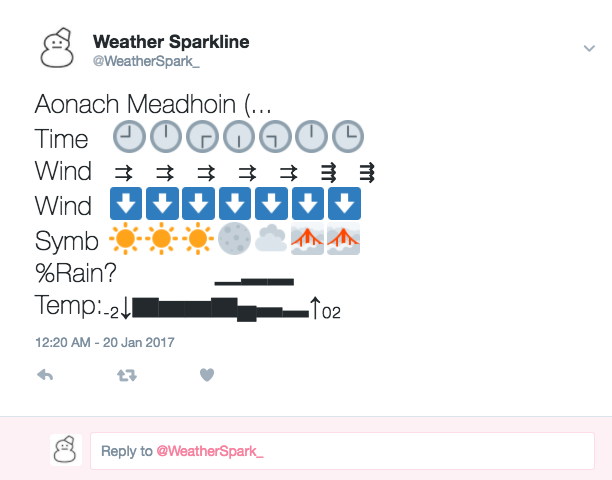
Thus inspired I thought I’d like to have a play with sparklines myself, but what to do? The weather domain seemed an obvious choice but over what platform would “data-intense, word-sized graphics” be particularly suited? With it’s strict character limit Twitter seemed and ideal place to give it a whirl, so I built Weather Sparkline. Weather Sparkline is a simple twitter bot built in Python and hosted on AWS that uses Met Office Datapoint data to provide a weather forecast to a random location every five minutes. In action it looks like this:
All the code is up on Github so feel free to have a nosey if your interested but I’ll go over some of the highlights below.
Show me the data 💽
The starting point for this project was getting weather forecast data. Lucky Met Office Data Point is a public API providing a range of weather forecasts and observations. For this project I used the 3 hourly site specific forecast. I wont go into any detail on using Datapoint as it’s documented on the Met Office Data Point website but if you do want to run the code yourself you’ll need to get a DataPoint API key.
Unicode 👍
I wanted this project to be able to target Twitter and so while there were some fantastic examples of using D3.js and other libraries to create brilliant sparklines I needed something that I tweetable and that’s why I chose Unicode. The history of text encoding (leading to Unicode) is fascinating and I suggest you look into it for your own fun. However, for our purposes it’s suffice to say that Unicode has changed the text landscape form a limited 128 characters (once upon a time) to over a million possible characters (though only about 10% are currently used)*.
Unicode in Python 🐍
There are lots of ways of putting Unicode characters into Python code and if you take a look at the code you’ll see a range of them. The best way is to simply put them in as if they were any other character. Try this in your python terminal
print("Hello, 🌍!")
and you’ll hopefully be rewarded by a new spin on an old classic. But if you try put the above in a file and run it
$ echo 'print("Hello, 🌍!")' > hi.py ; python hi.py
  File "hi.py", line 1
SyntaxError: Non-ASCII character '\xf0' in file hi.py on line 1, but no encoding declared; see http://python.org/dev/peps/pep-0263/ for details
😡 Aggghhh!
To fix this we need to let Python know what encoding our file is in. Really you should know what you are encoding you files in (most editors will let you see and set this), but often you can just assume UTF-8 and stick # -*- coding: utf-8 -*- at the top (or just after the #! line) of your file. If your encoding is different change the utf-8 bit. This done we can put in all our favourite (💩) Unicode symbols right into our Python code.
If you can’t encode your files in a suitable encode or for any other reason you want to stick to ASCII you can also express unicode characters using escaping. For example:
print (u"Don't look \u2193") # Notice the 'u' before we start the string indicating this is a unicode string.
You’ll probably want to use the hex code which you can easily look up with a quick Google.
There are yet more ways of Unicoding in Python, you might use these situations such as the above doesn’t work or you want to chose the symbol based on some numeric input.
print('Mini numbers: ' + ', '.join([unichr(8320 + i) for i in range(10)]))
from datetime import datetime

def clock(hr):
    offset = hr - 1
    offset = offset if offset >= 0 else 11
    s = "\\U%08x" % (128336 + offset)
    c = s.decode('unicode-escape')
    return c

print ('the time is ' + clock(datetime.now().hour % 12))
Making it Tweet 🐦
Hooking it all up to Twitter was easy but slow (because you need to wait for Twitter to move your keys). I followed Molly White’s blog on twitter bots which uses the Tweepy library. I made some small changes from her approach, the most important one is that I decided to put my Twitter secrets in to environment variables rather thank into a file. The advantage of this is that it’s less likely to accidentally end up on GitHub and still works well with tools like Docker and Terraform (which we’ll get to). The downside is a lot of environment variables, by this point we have one for datapoint and four for twitter and we’ll soon get two more for AWS.
Running the code ⚙
I decided that this app should run inside docker. This makes the application more portable, makes it easier to run in the same environment as you will deploy to and quick and easy to upgrade dependancies, such as Python. The docker file for this application turned out to be ludicrously simple:
FROM python:2-onbuild
ENV LANG en_US.UTF-8
CMD ["python", "./src/weather_sparkline_bot.py"]
The python:2 container I’m using as the base deals with pulling the scripts in the container and the CMD line sets our app to run inside the container when it starts up. I can’t 100% remember now what ENV LANG en_US.UTF-8 was about but I’m sure it was to get round a problem with the operating system inside the container not expecting the files to be UTF-8 and so complaining when it got to the more esoteric characters🕴
Deploying 🚀
The final step is deploying this app and in the spirit of repeatable deployments and infrastructure as code I chose to deploy this app to Amazon EC2 through Terraform. This requires installing Terraform, setting up an AWS account and getting your AWS secrets as environment variables. This done we are good to go. I won’t explain much about Terraform but in brief it’s away of expressing you infrastructure as code and gives you tools to automate building, destroying and maintaining this infrastructure. In our example most of the work is done in sparkline.tf
data "template_file" "bootstrap" {
  template = "${file("boot.tlp")}"
  vars = {
    DATAPOINT_KEY="${var.DATAPOINT_KEY}"
    WEATHERSPARK_C_TOKEN="${var.WEATHERSPARK_C_TOKEN}"
    WEATHERSPARK_C_SECRET="${var.WEATHERSPARK_C_SECRET}"
    WEATHERSPARK_A_TOKEN="${var.WEATHERSPARK_A_TOKEN}"
    WEATHERSPARK_A_SECRET="${var.WEATHERSPARK_A_SECRET}"
  }
}


resource "aws_instance" "theosparkline" {
  ami                   = "ami-d41d58a7"
  instance_type         = "t2.micro"
  key_name              = "gateway"
  user_data             = "${data.template_file.bootstrap.rendered}"
  tags {
    Name = "theo-spark-line"
  }
}
Which basically says “create me a AWS T2 micro instance and then run the bootstrap file on it when it’s ready”.
So when the server is up and ready our bootstrap file boot.tlp runs
#cloud-config
runcmd:
    # Install git
    - 'yum install -y git'

    # install docker
    - 'curl -sSL https://get.docker.com/ | sh'

    # Start Docker
    - 'service docker start'

    # Get, build and run container
    - 'mkdir -p /root/sparkline'
    - 'git clone https://github.com/tam203/sparkline.git /root/sparkline'
    - 'cd /root/sparkline'
    - 'docker build -t weather_sparkline_bot .'
    - 'docker run -dt -e DATAPOINT_KEY=${DATAPOINT_KEY} -e TWITTER_C_TOKEN=${WEATHERSPARK_C_TOKEN} -e TWITTER_C_SECRET=${WEATHERSPARK_C_SECRET} -e TWITTER_A_TOKEN=${WEATHERSPARK_A_TOKEN} -e TWITTER_A_SECRET=${WEATHERSPARK_A_SECRET} --restart=unless-stopped weather_sparkline_bot'
This file is a Cloud-Config file but we can think of it just as a script that runs some commands. In our case it installs docker and git then pulls down our souce code repository, builds the app and runs it. One thing to note is using the flag --restart=unless-stopped with Docker, this flag means that if the script crashes or has a problem Docker will just restart and start again.
Now if we have successfully installed Terraform and are all set up with our Datapoint (x1), Twitter (x4) and AWS (x2) environment variables we should simply need to run terraform apply and with in a few minutes our twitter bot will be Tweeting away with gems such as ‘The Cairnwell’.
